Well, I have created one of my favorite 10 cards, 1 kit collections AND I have a ton of goodies leftover! Half of the journaling cards/card starters, a ton of stickers, some pieces of cardstock already cut for other cards & a lot of half sheets & partial 6×6 papers. Not to shabby for a kit that costs $25.99! This is the best collection of cards I think I’ve compiled using various products, techniques & tips/tricks I think I have done since coming back from Family Leave earlier this year. I tried to create different designs than other DT Members that are doing a fabulous job! So, I hope you enjoy this 10 Cards/1 Kit video using the Spring Market line by Carta Bella:
We know many people are intimidated by the thought of Mixed Media but really, it’s crafting with another material besides paper… Some argue that it’s any other type of substrate or material, medium with as little, if any, paper at all. At Platinum Peacock, this argument about how much, if any, paper is allowed creates unnecessary confusion.
What is one to do? We don’t believe in crafting commandments but guidelines, such as odd numbers tend to look best. So, ratios of how much paper is involved doesn’t concern us too terribly much. There are some wonderfully talented mixed media artists out there but never forget that you are in charge of your creative journey. So, experiment a bit with us and see what you like. We have a fun, affordable, easy and fast card idea using mixed media principles. You can add as much detail as you’d like, as you see above in the pictures. The tag is card #10 in the video below:
An easy, cheap or dare we say FREE and easyway to dive into mixed media is by using newspaper and magazine articles to create a dry decoupage. Dry decoupage? Yes, if you have any type Xyron, it works great with torn and ripped pieces from a magazine and/or paper – using both gives you different colors of paper to apply to your cardstock. However, if you do not have any Xyron machine, you can use a tape runner, scor-tape, etc. We liked the look of the varied colors from the combination of magazine and newspaper, so we did a couple of layers so the background didn’t look flat. Then, we used a geometric stencil, Ranger Texture Paste, and an artist spatula set to smooth out the paste on top of the stencil. A knife or spoon from the kitchen will work – just keep whatever you use out of the kitchen afterwards! 🙂 We added a frame, a bit of silver mirror cardstock, “Happy Birthday” peel offs, a black Sharpie, and Nuvo Drops, all from LovefromLizi (except for the Sharpie). On the inside we use silver peels offs from LovefromLizi to maintain the classic black, white, and silver scheme for anything deco!
We’re beginning to explore mixed media more and thought this was a good staring point as you may have everything needed to achieve this look, or close to it, depending on your personal taste. The stencil can be any shape, of course, we just always try to do at least 1 male card a month. Love from Lizi’s had 300 GSM paper this month, so we did use that & it worked beautifully but you could use watercolor cardstock or anything with heft. Stay tuned this week: Getting more from you inks and everyday materials, Shabby Chic cards for the ladies and another card for the gents! It’s going to jam packed with creative ways to get more out your supplies with beautiful results. We’ll be posting throughout the week on Facebook, twitter, and Instagram. The video below takes you step-by-step with instructions. Stay crafty my friends! P.S. If you’d like to add color and shine to a project like this, check out our Nuvo Mousse video.
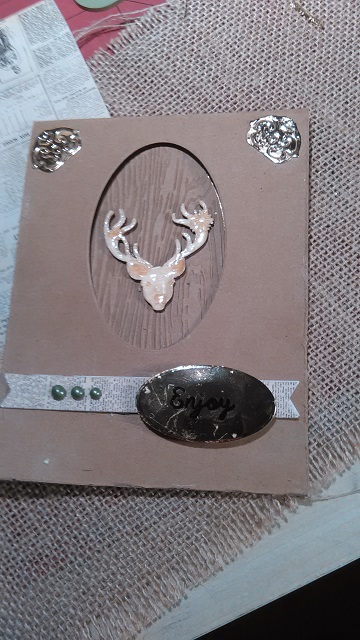
This one’s for the guys! We made this fun Stag card from the February 2017 LovefromLizi.com. The kit, as a whole, was feminine but we found a few of ways to add even more options for crafting from Lizi’s kit. Once we came out of shock from all of the beautiful papers, tags, glitter dots, and wood veneer accents – including the stag shown- we got to work!
We’ll walk you through each step in the video below:
BE SURE to check our blog on March 1st for the first LovefromLizi Blog Hop!!! You’ll have a chance to win a LovefromLizi kit OR 20 British pounds worth of products from the one & only LovefromLizi.com store! A chance for unique & fun crafty goodness for free? Oh yes, my friends! Who doesn’t love that around this time of year?
—We have begun a page for messages for the inside of your card(s).— May we suggest having a bit of fun with the message inside of this card? Steer your own path.
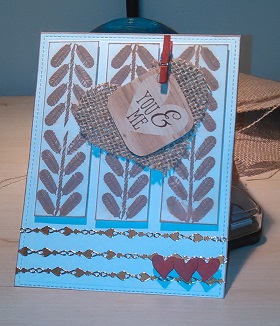
With Valentine’s Day fast approaching we thought we’d share with you some advice on how to make a card for that special someone in your life. This week’s project is a burlap heart card using elements from the Love from Lizi January card kit. For detailed instructions on how to make this card, please view the YouTube video below.
Hope you found this helpful. If you did, please subscribe to our Platinum Peacock YouTube channel. Stay crafty my friends!
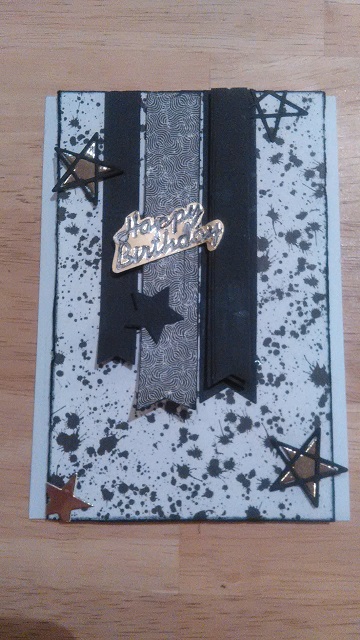
Our design team put together three new cards using elements from the Love from Lizi December card kit. The first is a “Happy Birthday” card that we like to call a “guy card” as it has a style fitting to give to the men in your life.
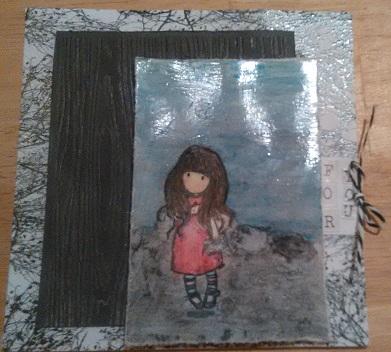
The second card is a “For You” card. The focal point is a Santoro girl stamp from the Love from Lizi December kit that we brought to life using Prisma watercolor pencils with glossy accents for the water in the background.
The final card is our “Ball Drop” New Year card. It features a layered die cut “ball” that you can actually slide up and down to simulate the famous Times Square ball drop.
Next week we’ll be shifting our focus to Valentine’s Day cards. Be sure to follow us on Twitter, Pinterest, Instagram and Facebook for our latest updates!