Valentine’s Day Card Tutorial 4

vellumhearts

We continue our Valentine’s Day card tutorials with an elegant card made with elements from the Love from Lizi January 2017 card kit.  A pair of embossed vellum die-cut hearts serve as the centerpiece while the gilded chain border commands attention.  The pearl heart embellishments provide a nice complement to the milky white hue of the vellum.  And it’s all tied nicely together with a bow.  You can find instructions on how to make this card by watching the YouTube video below:


If you liked this project, please remember to subscribe to our YouTube channel to see future projects.  Stay crafty my friends!

Valentine’s Day Card Tutorial 3

tagcard1

We continue our Valentine’s Day card series with a tag-themed card made using elements from the Love from Lizi January card kit.  The wood grain background and craft tag provide a natural look, while the gilded chains and dots give it just enough bling.  Instructions on how to make this card are found in the video below.


If you enjoyed this project, please remember to subscribe to our YouTube channel.  Stay crafty my friends!


Valentine’s Day Card Tutorial 2

locketcard

Today’s post continues our Valentine’s series with a simple yet elegant locket card.  This card was made using elements from the Love from Lizi January 2017 card kit.  As a bonus we also did a clutch-themed card and coordinating gift card holder as seen below.


Detailed instructions showing how to make all three projects can be found by watching the YouTube video below:


To see more projects like this, please subscribe to our Platinum Peacock YouTube channel. Stay crafty my friends!

Valentine’s Day Card Tutorial 1

burlapheart

With Valentine’s Day fast approaching we thought we’d share with you some advice on how to make a card for that special someone in your life.  This week’s project is a burlap heart card using elements from the Love from Lizi January card kit.  For detailed instructions on how to make this card, please view the YouTube video below.


Hope you found this helpful.  If you did, please subscribe to our Platinum Peacock YouTube channel.  Stay crafty my friends!

Fun Platinum Peacock Plans!

We are thrilled to announce that we received a new, better camera to do posts! Each month we will be doing: a male card, a clean & simple card, a gatefold or “jazzy” card – in good taste, and a Platinum Peacock Design card. In addition, we will be starting our Valentine’s Day series from the Love from Lizi January kit. Pictures will be posted on Instagram, Twitter, & Pinterest as well. There may even be bonus projects here on the blog & Social Media. 😉 (The card tutorials will use items from the unboxing video available for viewing right here on the blog &/or YouTube.) So, now you have an idea of what to expect from us, we hope you’ll follow us on this creative journey! From Tim Holtz, to Couture Creations, & even Anna Griffin, we hope to inspire you with creativity & versatility. In turn, you have all inspired us to keep going with a messy craft desk to prove it! If you have questions, suggestions, or comments, please use our “Contact Us” page here on the blog. Stay Crafty My Friends!

YouTube Channel Launch

We have launched a new Platinum Peacock channel on YouTube.  You can visit our channel by clicking on the following link: platinumpeacockchannel .  Our first video is a Love from Lizi January card kit unboxing video.  In it you will see the entire contents of the kit in great detail.  We think it’s her best kit yet (and that’s saying a lot)!  Check out the video below.  If you like the video, please subscribe to our YouTube channel.  And don’t forget to visit lovefromlizi.com to see all of her crafting products.


Three New Cards to Kick off 2017

Our design team put together three new cards using elements from the Love from Lizi December card kit.  The first is a “Happy Birthday” card that we like to call a “guy card” as it has a style fitting to give to the men in your life.

birthday1

The second card is a “For You” card.  The focal point is a Santoro girl stamp from the Love from Lizi December kit that we brought to life using Prisma watercolor pencils with glossy accents for the water in the background.

foryou1

The final card is our “Ball Drop” New Year card.  It features a layered die cut “ball” that you can actually slide up and down to simulate the famous Times Square ball drop.

Next week we’ll be shifting our focus to Valentine’s Day cards.  Be sure to follow us on Twitter, Pinterest, Instagram and Facebook for our latest updates!


Bubbly New Year Card

1.Cut and score a sheet of 12×8 1/4 or 11×8.5 in half vertically, leaving 3/4 inch on one side longer than the other. The shorter portion will be the front of your card. You should end up with a folded edge towards the sky; a top folding card. Yes, the card does stand for easy display!

bubbly9

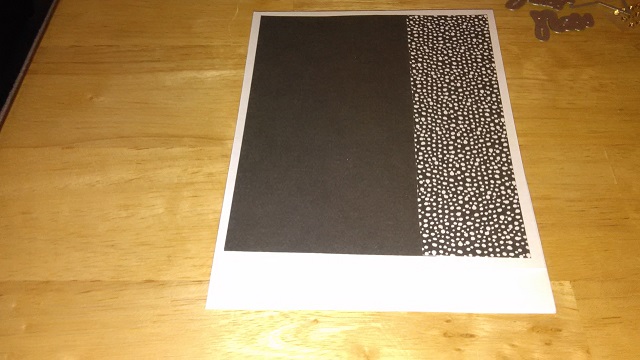
2. Use the black side of one of the double-sided papers, add glue or an adhesive runner on roughly 3/4 on the front of the base. (Use about 3 inches in width almost 6 inches in length) on one side of the card.) We say ABOUT because everyone measures and cuts things differently: some want perfection & others are ok with imperfection. It is a HANDMADE card and you should enjoy creating it!

3. Using the paper that has black and white dots, adhere the straight edge facing the black paper, a generous 1×6 inches.

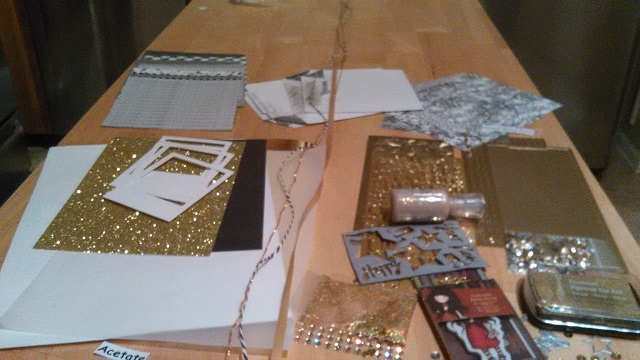
***TIPS***If possible, take a couple of minutes to plan which papers you’d like to use on a card with multiple papers to minimize cutting/trimming. That way, you can add a straight edge of black paper and a straight edge of the black & white bubble paper to your card front.

bubbly3

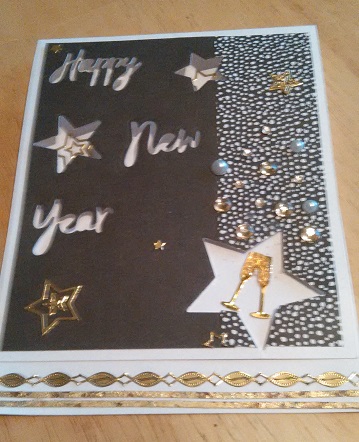
4. Using the champagne flute die, use the gold mirror cardstock from “Love from Lizi” then add Nuvo Crystal Drops for the champagne itself.

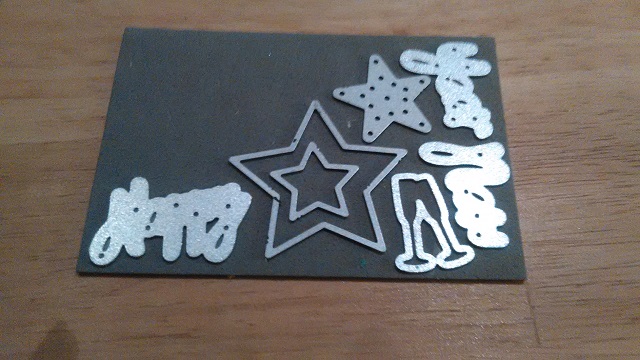
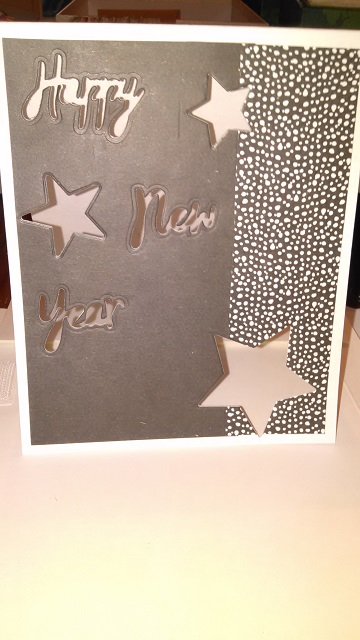
5.Trim or cut away excess paper. Open card completely and lay on your cutting platform to position the “Happy New Year”and star dies from the December “Love from Lizi”kit, or 3 different sizes star dies if you weren’t able to grab the kit. *Tip* Use the cutting side UP of the die so you don’t pull or scratch you paper.

6. After you like the way the dies are positioned, flip the dies to have the cutting edge down and secure with washi tape to prevent shifting.

Remember to only cut the top part of the card!!!! If your accidentally cut thru both layers, add strong adhesive to the back panel in white or some of the gold or black glitter paper included in the kit. (Save the stars you cut out, too. A crafting trait is to never toss anything!)

bubbly1

7. Add gold star peel offs to the front and inside of the card for interest. Glue the dried champagne flutes with Matte Medium to the inside of a star cut out. Also, use the small and large gold rhinestones in an upward motion from the flutes. We used a few white medium and small pearls from “Love from Lizi” November kit… That pop of white makes a big difference but you could use enamel accents or your stash if need be.

8. Add rope design peel off in the middle of the card at the bottom of the card. The peel offs are a bit stretchy AND stronger than they may appear to you. If you don’t get exact placement, you can peel off the crooked edge & realign. Then, smooth it & you should be fine. IF you wish, add gilding flakes to the BACK/adhesive side of 2 border peel offs and attach with matte medium. That’s what we did, using mostly gold & copper flakes 0n the back. Gently rub gilding flakes with a microfiber cloth and mail!

bubbly8

We hope you enjoy making a card like this! YOU TUBE videos will be up in about a week!!! Hope to see all of you there!

Love From Lizi December Card Kit

Now that Christmas is over we’ve packed up our Christmas card making supplies and unboxed the Love From Lizi December Card Kit which features a black and gold theme and several dies and embellishments perfect for making “Happy New Year” cards.  However, as you examine the contents of the kit in the pictures below, you’ll soon find as we did that the kit has elements that are versatile enough for use for other occasions as well. We inked some of the paper so you can see the texture that it has. Check back soon as we’ll be featuring cards made from this kit in upcoming posts.

deckit1

deckit5

deckit3

deckit4

deckit6

Last Minute Christmas Card Ideas

We think handmade cards for any time of the year should be special for loved ones and friends. At Christmas, it’s nice to balance clean and simple cards with special cards to optimize your time and enjoyment. Showcase your talent by using flocked paper, glitter &/or foil die cuts. You decide what works for you and go with it. Handmade cards are a good way to show how much you care and are always appreciated! Merry Christmas!

reindeercard3

flakey

anna-angel

flocked-simple